Lashing Out! Eyelash tutorial.
What you need:
*Eyelashes...preferably a strip without glue on it. (Dollmore, or Volks sell them.)
*Aleene's Quik Dry Tacky Glue
(I recommend the Quik Dry, or you'll be waiting for FOREVER.)
(Never EVER EVER use Crazy Glue! It's from the devil.)
*Angled tweezers
*Angled scissors (that little piece of yarn is there to warn my family--"touch & die.")
*Toothpicks
*Damp Cotton Swab (not pictured.)

Hold your eyelash strip up to the doll's eye to get a rough estimate of how much you'll need.

Cut the section off the strip and gently roll your lash around a pencil to give it some curl.

Take the Quik Dry Tacky Glue and apply it to a toothpick.
(This is a water based glue. If you ever want to remove the lashes, just wet a Qtip and dab on the lashes and they will come off. Never use any glue but a water based glue. )
Dot dot dot the glue from her tear duct to the center of her eye. (Do not go past the center.)

Apply tacky glue to half of the eyelash.
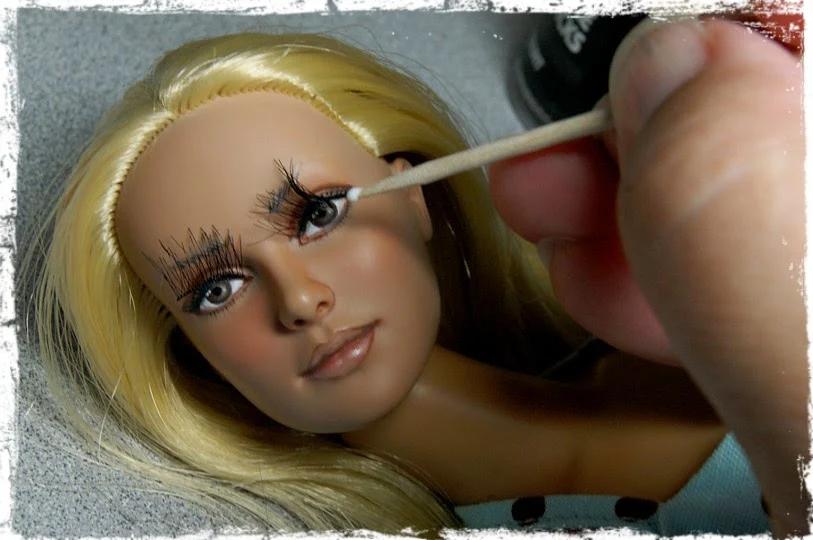
See that Q-tip? I always have a damp one there just in case I get some glue on my doll
so I can quickly wipe it off.

Allow to sit for a few seconds and then with your angled tweezers, place the lash against the eyelid -glue to glue.

With a clean toothpick, gently press the lash into place.
Go make a sandwich, waste time on Facebook, place a bid on a doll, or move your wash to the dryer, and allow the glue to dry.

Once the glue has set, press the eyelash down, so you can judge where it needs to end.

Pull the lash up gently, and cut to fit.


Pull the lash back and run a bead of glue on her upper lid,
and run a bead of glue on the back of her eyelash.
With the clean toothpick, press down and position.
Allow the spider lady's eyes to dry.

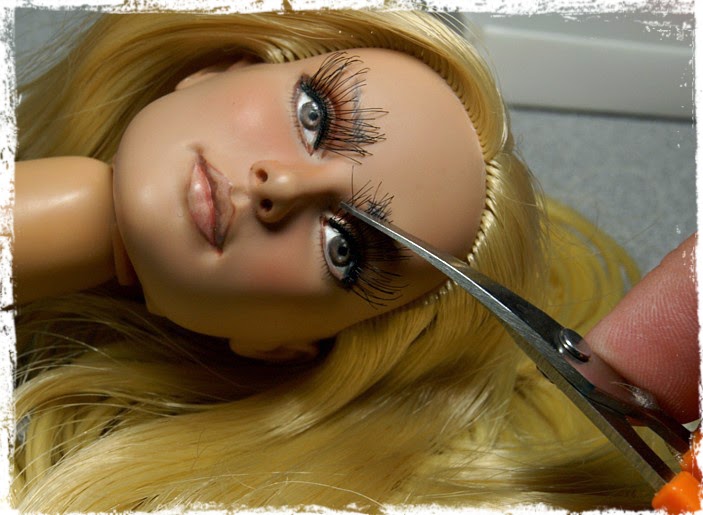
Once they are dry, take your angled scissors and trim the lashes.

From ordinary to extraordinary. Love those lashes, Daphne!

What you need:
*Eyelashes...preferably a strip without glue on it. (Dollmore, or Volks sell them.)
*Aleene's Quik Dry Tacky Glue
(I recommend the Quik Dry, or you'll be waiting for FOREVER.)
(Never EVER EVER use Crazy Glue! It's from the devil.)
*Angled tweezers
*Angled scissors (that little piece of yarn is there to warn my family--"touch & die.")
*Toothpicks
*Damp Cotton Swab (not pictured.)

Hold your eyelash strip up to the doll's eye to get a rough estimate of how much you'll need.

Cut the section off the strip and gently roll your lash around a pencil to give it some curl.

Take the Quik Dry Tacky Glue and apply it to a toothpick.
(This is a water based glue. If you ever want to remove the lashes, just wet a Qtip and dab on the lashes and they will come off. Never use any glue but a water based glue. )
Dot dot dot the glue from her tear duct to the center of her eye. (Do not go past the center.)

Apply tacky glue to half of the eyelash.
See that Q-tip? I always have a damp one there just in case I get some glue on my doll
so I can quickly wipe it off.

Allow to sit for a few seconds and then with your angled tweezers, place the lash against the eyelid -glue to glue.

With a clean toothpick, gently press the lash into place.
Go make a sandwich, waste time on Facebook, place a bid on a doll, or move your wash to the dryer, and allow the glue to dry.

Once the glue has set, press the eyelash down, so you can judge where it needs to end.

Pull the lash up gently, and cut to fit.


Pull the lash back and run a bead of glue on her upper lid,
and run a bead of glue on the back of her eyelash.
With the clean toothpick, press down and position.

Allow the spider lady's eyes to dry.

Once they are dry, take your angled scissors and trim the lashes.
From ordinary to extraordinary. Love those lashes, Daphne!

___
All text and photos in this post are by Laurie Lenz
Laurie's website is called "Laurie Lenz Angels Doll Studio" and you can see her fabulous work at this link:
This is a fabulous tutorial and one that I truly needed! I have a project that I will get to one of these days. :) Thanks for the info!
ReplyDeleteOMG- Two tips that makes sense, and no one ever mentioned before. Glue the lashes one half at a time until set, then glue the other half. Curling the strip of lashes BEFORE gluing to get the curve. THANK YOU, Laurie!!!!! :)
ReplyDeleteFantastic tutorial Laurie! Thanks so much for creating this, and thank you for posting and sharing it Terri! I've always pre-trimmed the lashes, which can be somewhat hit-or-miss. But I think Laurie's technique allows for more precise results. I also love the tip about using Aleene's Quik Dry Tacky Glue! I've been using the regular Aleene's, and she's right in saying it takes forever to dry (like hours), Quik Dry formula seems like it will be such a time saver!
ReplyDelete